Amazon VPC Architecture
Imagine Amazon VPC as a private neighborhood in the vast city that is the internet. In this neighborhood, you get to build your own house (virtual private cloud) and set up your own rules. It’s like having your own little piece of the internet where you can control who comes in and what they can do. Now, just like in a real neighborhood, you have streets and houses. In Amazon Virtual Private Cloud, these are like the virtual networks and servers. You can decide how these streets connect, who can walk on them, and who can visit your house.
The cool thing is, you can customize everything! Want a swimming pool (internet gateway) to connect to the outside world? You got it. Need a fence (network access control lists) to keep some nosy neighbors out? No problem. You’re like the mayor of your own internet town! So, in a nutshell, Amazon Virtual Private Cloud is like having your own little piece of the internet where you can build and control things the way you want. It’s your digital space in the big online city.

Amazon Virtual Private Cloud (VPC) is a service that lets you launch AWS resources in a logically isolated virtual network that you define. You have complete control over your virtual networking environment, including selection of your own IP address range, creation of subnets, and configuration of route tables and network gateways. You can use both IPv4 and IPv6 for most resources in your VPC, helping to ensure secure and easy access to resources and applications.
As one of AWS’s foundational services, Amazon VPC makes it easy to customize your VPC’s network configuration. You can create a public-facing subnet for your web servers that have access to the internet. It also lets you place your backend systems, such as databases or application servers, in a private-facing subnet with no internet access. Amazon VPC lets you to use multiple layers of security, including security groups and network access control lists, to help control access to Amazon Elastic Compute Cloud (Amazon EC2) instances in each subnet.
Please note that the specific details may vary based on your needs, but this will give you a general idea about Amazon Virtual Private Cloud architecture:
-
VPC (Virtual Private Cloud):
- Think of this as the entire boundary of your digital neighborhood.
- Your VPC has its own IP address range, like a unique postal code for your internet space.
-
Subnets:
- Inside your VPC, you have different areas called subnets.
- Subnets are like blocks of houses on specific streets.
- You might have a subnet for your front yard (public subnet) and a backyard (private subnet).
-
Internet Gateway:
- This is like the gateway to the outside world.
- Your VPC can have an Internet Gateway, allowing instances in your public subnet to communicate with the internet.
-
Route Tables:
- These are like maps for your virtual streets.
- They decide where the traffic should go, whether it stays within your neighborhood or heads out to the internet.
-
Security Groups:
- Imagine these as security guards for each house.
- They control the traffic in and out of each instance (server) in your VPC.
-
Network ACLs (Access Control Lists):
- These are like fences between different blocks in your neighborhood.
- They control traffic at the subnet level.
-
VPN (Virtual Private Network) Connections:
- If you want a secure tunnel to connect your VPC to another network (like your office), you’d use a VPN connection.
-
VPC Peering:
- This is like having secret passages between different neighborhoods.
- You can connect your VPC with another one, allowing them to communicate securely.
-
Elastic Load Balancer (ELB):
- If you have multiple servers in your public subnet, an ELB distributes incoming traffic among them, ensuring everything runs smoothly.
-
Amazon RDS (Relational Database Service):
- If you have a database, you can place it in your private subnet, and it can be accessed securely by your application servers.
Remember, this is a simplified overview. Depending on your specific needs, your VPC architecture may include additional components or have a more complex setup.
Features
Amazon VPC (Amazon Virtual Private Cloud) comes with a variety of features that allow users to create a private, secure, and highly customizable network within the AWS cloud environment. Here are some key features of Amazon VPC:
-
Isolation and Segmentation:
- Amazon VPC allows you to isolate your resources and logically segment your network, creating private and public subnets.
-
Custom IP Address Ranges:
- Users can define their own IP address range for their VPC, providing flexibility in designing the network architecture.
-
Subnet Creation:
- You can create multiple subnets within your VPC, allowing you to organize resources and control access more granularly.
-
Internet Gateway:
- An Internet Gateway enables communication between instances in your VPC and the internet, allowing resources in public subnets to be accessible from the outside.
-
NAT Gateway/NAT Instance:
- For instances in private subnets to access the internet, Network Address Translation (NAT) gateways or instances can be used to facilitate outbound traffic.
-
Elastic Load Balancing (ELB):
- ELB can distribute incoming traffic across multiple instances in your VPC, providing high availability and fault tolerance for your applications.
-
Security Groups:
- Security groups act as virtual firewalls, controlling inbound and outbound traffic for instances. They are stateful, which means if you allow inbound traffic, the corresponding outbound traffic is automatically allowed.
-
Network Access Control Lists (NACLs):
- NACLs are stateless packet filters that control traffic at the subnet level. They provide an additional layer of security for your VPC.
-
VPC Peering:
- VPC peering allows you to connect one VPC to another, enabling the exchange of traffic between them securely.
-
VPN Connections:
- Amazon VPC supports the creation of secure VPN connections to connect your on-premises network to your VPC, extending your data center into the cloud.
-
Direct Connect:
- For organizations with higher network demands, AWS Direct Connect provides a dedicated network connection between an on-premises data center and your VPC.
-
Elastic Network Interfaces (ENIs):
- ENIs can be attached to instances, providing additional network interfaces and allowing for more complex network setups.
-
Route Tables:
- Route tables define the rules for traffic within the VPC. You can customize route tables to direct traffic based on your requirements.
-
Resource Tagging:
- You can tag your VPC resources, making it easier to manage and organize them. Tags can be used for billing, resource identification, and other purposes.
These features collectively provide users with the tools to build secure, scalable, and highly available network architectures within the AWS cloud using Amazon VPC.

Working with Amazon VPC – INTERFACES
You can create and manage your VPCs using any of the following interfaces:
-
AWS Management Console — Provides a web interface that you can use to access your VPCs.
-
AWS Command Line Interface (AWS CLI) — Provides commands for a broad set of AWS services, including Amazon VPC, and is supported on Windows, Mac, and Linux. For more information, see AWS Command Line Interface.
-
AWS SDKs — Provides language-specific APIs and takes care of many of the connection details, such as calculating signatures, handling request retries, and error handling. For more information, see AWS SDKs.
-
Query API — Provides low-level API actions that you call using HTTPS requests. Using the Query API is the most direct way to access Amazon VPC, but it requires that your application handle low-level details such as generating the hash to sign the request, and error handling. For more information, see Amazon VPC actions in the Amazon EC2 API Reference.
Default VPCs
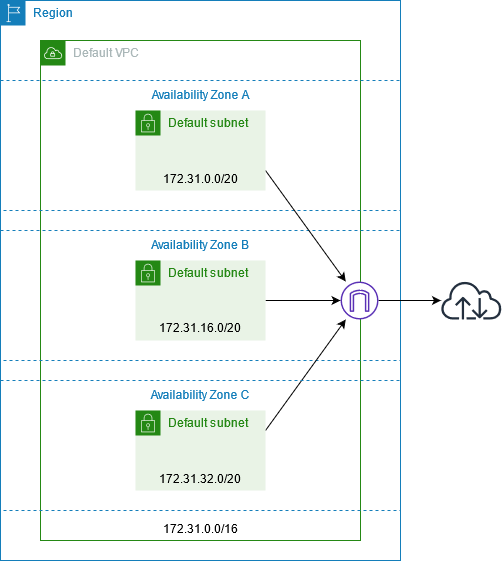
When you start using Amazon VPC, you have a default VPC in each AWS Region. A default VPC comes with a public subnet in each Availability Zone, an internet gateway, and settings to enable DNS resolution. Therefore, you can immediately start launching Amazon EC2 instances into a default VPC. You can also use services such as Elastic Load Balancing, Amazon RDS, and Amazon EMR in your default VPC.
A default VPC is suitable for getting started quickly and for launching public instances such as a blog or simple website. You can modify the components of your default VPC as needed.
You can add subnets to your default VPC. For more information, see Create a subnet.
Contents
Default VPC components
When we create a default VPC, we do the following to set it up for you:
-
Create a VPC with a size
/16IPv4 CIDR block (172.31.0.0/16). This provides up to 65,536 private IPv4 addresses. -
Create a size
/20default subnet in each Availability Zone. This provides up to 4,096 addresses per subnet, a few of which are reserved for our use. -
Create an internet gateway and connect it to your default VPC.
-
Add a route to the main route table that points all traffic (
0.0.0.0/0) to the internet gateway. -
Create a default security group and associate it with your default VPC.
-
Create a default network access control list (ACL) and associate it with your default VPC.
-
Associate the default DHCP options set for your AWS account with your default VPC.
Note
Amazon creates the above resources on your behalf. IAM policies do not apply to these actions because you do not perform these actions. For example, if you have an IAM policy that denies the ability to call CreateInternetGateway, and then you call CreateDefaultVpc, the internet gateway in the default VPC is still created.
The following figure illustrates the key components that we set up for a default VPC.

The following table shows the routes in the main route table for the default VPC.
| Destination | Target |
|---|---|
| 172.31.0.0/16 | local |
| 0.0.0.0/0 | internet_gateway_id |
You can use a default VPC as you would use any other VPC:
-
Add additional nondefault subnets.
-
Modify the main route table.
-
Add additional route tables.
-
Associate additional security groups.
-
Update the rules of the default security group.
-
Add AWS Site-to-Site VPN connections.
-
Add more IPv4 CIDR blocks.
-
Access VPCs in a remote Region by using a Direct Connect gateway. For information about Direct Connect gateway options, see Direct Connect gateways in the AWS Direct Connect User Guide.
You can use a default subnet as you would use any other subnet; add custom route tables and set network ACLs. You can also specify a specific default subnet when you launch an EC2 instance.
You can optionally associate an IPv6 CIDR block with your default VPC.
Default subnets
By default, a default subnet is a public subnet, because the main route table sends the subnet’s traffic that is destined for the internet to the internet gateway. You can make a default subnet into a private subnet by removing the route from the destination 0.0.0.0/0 to the internet gateway. However, if you do this, no EC2 instance running in that subnet can access the internet.
Instances that you launch into a default subnet receive both a public IPv4 address and a private IPv4 address, and both public and private DNS hostnames. Instances that you launch into a nondefault subnet in a default VPC don’t receive a public IPv4 address or a DNS hostname. You can change your subnet’s default public IP addressing behavior. For more information, see Modify the public IPv4 addressing attribute for your subnet.
From time to time, AWS may add a new Availability Zone to a Region. In most cases, we automatically create a new default subnet in this Availability Zone for your default VPC within a few days. However, if you made any modifications to your default VPC, we do not add a new default subnet. If you want a default subnet for the new Availability Zone, you can create one yourself. For more information, see Create a default subnet.
View your default VPC and default subnets
You can view your default VPC and subnets using the Amazon VPC console or the command line.
To view your default VPC and subnets using the console
-
Open the Amazon VPC console at https://console.aws.amazon.com/vpc/.
-
In the navigation pane, choose Your VPCs.
-
In the Default VPC column, look for a value of Yes. Take note of the ID of the default VPC.
-
In the navigation pane, choose Subnets.
-
In the search bar, type the ID of the default VPC. The returned subnets are subnets in your default VPC.
-
To verify which subnets are default subnets, look for a value of Yes in the Default Subnet column.
To describe your default VPC using the command line
-
Use the describe-vpcs (AWS CLI)
-
Use the Get-EC2Vpc (AWS Tools for Windows PowerShell)
Use the commands with the isDefault filter and set the filter value to true.
To describe your default subnets using the command line
-
Use the describe-subnets (AWS CLI)
-
Use the Get-EC2Subnet (AWS Tools for Windows PowerShell)
Use the commands with the vpc-id filter and set the filter value to the ID of the default VPC. In the output, the DefaultForAz field is set to true for default subnets.
Create a default VPC
If you delete your default VPC, you can create a new one. You cannot restore a previous default VPC that you deleted, and you cannot mark an existing nondefault VPC as a default VPC.
When you create a default VPC, it is created with the standard components of a default VPC, including a default subnet in each Availability Zone. You cannot specify your own components. The subnet CIDR blocks of your new default VPC may not map to the same Availability Zones as your previous default VPC. For example, if the subnet with CIDR block 172.31.0.0/20 was created in us-east-2a in your previous default VPC, it may be created in us-east-2b in your new default VPC.
If you already have a default VPC in the Region, you cannot create another one.
To create a default VPC using the console
-
Open the Amazon VPC console at https://console.aws.amazon.com/vpc/.
-
In the navigation pane, choose Your VPCs.
-
Choose Actions, Create Default VPC.
-
Choose Create. Close the confirmation screen.
To create a default VPC using the command line
You can use the create-default-vpc AWS CLI command. This command does not have any input parameters.
aws ec2 create-default-vpcThe following is example output.
{
    "Vpc": {
        "VpcId": "vpc-3f139646",
        "InstanceTenancy": "default",
        "Tags": [],
        "Ipv6CidrBlockAssociationSet": [],
        "State": "pending",
        "DhcpOptionsId": "dopt-61079b07",
        "CidrBlock": "172.31.0.0/16",
        "IsDefault": true
    }
}
Alternatively, you can use the New-EC2DefaultVpc Tools for Windows PowerShell command or the CreateDefaultVpc Amazon EC2 API action.
Create a default subnet
You can create a default subnet in an Availability Zone that does not have one. For example, you might want to create a default subnet if you have deleted a default subnet, or if AWS has added a new Availability Zone and did not automatically create a default subnet for that zone in your default VPC.
When you create a default subnet, it is created with a size /20 IPv4 CIDR block in the next available contiguous space in your default VPC. The following rules apply:
-
You cannot specify the CIDR block yourself.
-
You cannot restore a previous default subnet that you deleted.
-
You can have only one default subnet per Availability Zone.
-
You cannot create a default subnet in a nondefault VPC.
If there is not enough address space in your default VPC to create a size /20 CIDR block, the request fails. If you need more address space, you can add an IPv4 CIDR block to your VPC.
If you’ve associated an IPv6 CIDR block with your default VPC, the new default subnet does not automatically receive an IPv6 CIDR block. Instead, you can associate an IPv6 CIDR block with the default subnet after you create it. For more information, see Add an IPv6 CIDR block to your subnet.
You cannot create a default subnet using the AWS Management Console.
To create a default subnet using the AWS CLI
Use the create-default-subnet AWS CLI command and specify the Availability Zone in which to create the subnet.
aws ec2 create-default-subnet --availability-zone us-east-2aThe following is example output.
{
    "Subnet": {
        "AvailabilityZone": "us-east-2a",
        "Tags": [],
        "AvailableIpAddressCount": 4091,
        "DefaultForAz": true,
        "Ipv6CidrBlockAssociationSet": [],
        "VpcId": "vpc-1a2b3c4d",
        "State": "available",
        "MapPublicIpOnLaunch": true,
        "SubnetId": "subnet-1122aabb",
        "CidrBlock": "172.31.32.0/20",
        "AssignIpv6AddressOnCreation": false
    }
}
For more information about setting up the AWS CLI, see the AWS Command Line Interface User Guide.
Alternatively, you can use the New-EC2DefaultSubnet Tools for Windows PowerShell command or the CreateDefaultSubnet Amazon EC2 API action.
Delete your default subnets and default VPC
You can delete a default subnet or default VPC just as you can delete any other subnet or VPC. However, if you delete your default subnets or default VPC, you must explicitly specify a subnet in one of your VPCs when you launch instances. If you do not have another VPC, you must create a VPC with a subnet in at least one Availability Zone. For more information, see Create a VPC.
If you delete your default VPC, you can create a new one. For more information, see Create a default VPC.
If you delete a default subnet, you can create a new one. For more information, see Create a default subnet. To ensure that your new default subnet behaves as expected, modify the subnet attribute to assign public IP addresses to instances that are launched in that subnet. For more information, see Modify the public IPv4 addressing attribute for your subnet. You can only have one default subnet per Availability Zone. You cannot create a default subnet in a nondefault VPC.


Leave a Reply